They Don’t Need Your Password Anymore: Inside the Remote-Access Scam Wave — and How to Find What They Left Behind

Preliminary note: the detection and removal steps below will get a confident, technical user most of the way through cleaning one of these machines. What they will not do is tell you whether anything was taken, or close the account exposure that follows. If this happened to a business machine, or if money or email accounts were touched, get a professional involved before you declare victory on the strength of a successful uninstall. I’ve now cleaned four of these in about two weeks, and no two were identical.

Something shifted in this category over the past year, and I don’t think most people have caught up to it yet.

The old tech-support scam had a predictable ending. Scary pop-up, phone number, friendly voice, remote session, and then a sales pitch — $400 for “lifetime protection” that consisted of a free malware scanner and a receipt. Annoying, expensive, but bounded. The remote session was the sales tool.

That’s not what I’m seeing now. Now the remote session is the product. They don’t want to sell you anything. They want to sit on the machine quietly, sometimes for months, and use it as you.

Four machines have come through my lab since late August carrying this exact pattern. One desktop had four separate ScreenConnect clients installed across a two-week window in May, every one of them still running when the owner brought it to me in late August — roughly a hundred days of uninterrupted access, discovered only because someone tried to drain his airline miles and got sloppy with his bank. A laptop had Breeze RMM and ScreenConnect installed 90 seconds apart, which is not the cadence of a human clicking through two installers. A long-time client of mine got hit a second time and arrived with four ScreenConnect clients, the oldest dating to June. And a fourth machine had a trojanized ScreenConnect.ClientSetup.exe come down from a compromised host overseas; Defender caught that one about sixty seconds after it landed, fortunately, though it doesn’t always work out that way.

Same playbook, four different front doors. Let me explain why this approach works so well, because once you understand the economics of it, the rest of the article makes a lot more sense.

Why Stealing Your Password Is the Hard Way to Do This

Credential theft has gotten expensive for the bad guys, and that’s mostly a good-news story. Multi-factor authentication is finally common. Banks and the big identity providers now score every login attempt: Is this device recognized? Is this IP address consistent with where this person normally is? Is the browser fingerprint the same? Did they get here at a plausible hour? A stolen username and password dropped into a login form from a VPS in another hemisphere trips every one of those wires at once.

So they stopped fighting the risk engine and started sitting behind it.

When someone has interactive remote control of your computer, they aren’t logging in as you. They’re using your already-authenticated session, and the difference is enormous:

  • Your session cookies and refresh tokens are already in the browser. Your bank, your email, your brokerage, your retirement account — many of those are already signed in, or one click from it. No password prompt ever appears.
  • Your MFA has already been satisfied. Most services set a “trusted device” cookie after you complete a second factor, valid for weeks or months. The attacker inherits that trust automatically.
  • Your IP address is your IP address. Same residential connection, same city, same ISP. No impossible-travel alert. No “we noticed a sign-in from a new location” email. Nothing for the fraud department to flag.
  • Your device fingerprint matches. Same operating system, same browser build, same screen resolution, same time zone, same installed fonts. To the bank, this is you on your own computer doing something unusual — which is a category of event their systems are designed to tolerate.
  • Your saved passwords and autofill are right there. They often don’t even need them, but the browser vault, the saved cards, and the address autofill are all available if they do.

Set the money aside for a second, because the account that matters most is usually email. Email is the password-reset endpoint for everything else you own, and it’s also an intelligence file: who your accountant is, which bank you use, what your title insurance company sent you last month, what your law firm charges. An hour of quiet reading gives a stranger a better picture of your financial life than a stolen credit card ever would.

And that’s where this turns into a business problem instead of a personal one.

The Pivot Nobody Sees Coming: Your Email Becomes Their Invoice

They get in. They read. They find a live thread where you’re expecting to pay someone, or expecting to be paid — a closing, a contractor draw, a vendor invoice, a commission check. They don’t hijack anything dramatically. They wait, then reply in your existing thread, from your actual mailbox, with your actual signature block and the full quoted history underneath, saying the banking details have changed and here’s the updated wire instruction.

Then they create an inbox rule that quietly files the replies somewhere you won’t look, so the “wait, is this right?” message never reaches you.

The money lands in a mule account, and by the time anyone notices, it’s gone through three more. Nobody’s antivirus was going to catch that, because nothing about it was malware. It was a legitimate email sent from a legitimate mailbox by someone sitting at a legitimate computer. Like any other potentially powerful tool — a gun, a chainsaw — there is nothing wrong with the tool; it’s the user that renders it dangerous.

This is why, when I tell a residential client that a remote-access agent has been on their machine since May, I’m not being dramatic about the password advice. The exposure isn’t limited to what’s on the hard drive. It extends to everyone who trusts email from that address.

They Install More Than One — On Purpose.

This is a critical point that many people miss.

On the desktop I mentioned, the four ScreenConnect clients were registered on May 15th, 16th, 18th, and 29th. Four installs, spread across two weeks, with distinct instance identifiers — meaning distinct session endpoints. On another machine it was Breeze RMM and ScreenConnect back to back, plus a Chrome Remote Desktop host that had been sitting there since July.

That redundancy is deliberate, and it’s designed around exactly what a reasonable person does next:

  1. You notice something odd, or a family member does.
  2. You go to Programs and Features, find “ScreenConnect Client,” and uninstall it.
  3. You feel better. You tell yourself you caught it.
  4. Three weeks later they come back in through agent number two, which you never saw, and now they know you’re watching.

This is also why the timeline matters so much, and why I reconstruct one on every single case. Two installs 90 seconds apart were not performed by the person sitting at the keyboard. That spacing is the signature of a remote operator pushing software, and it tells me the first tool was used to deploy the second — which in turn tells me to stop looking for “the infection” and start looking for a deployment channel.

Why an RMM agent in the mix is a different animal

When one of these installs turns out to be a remote monitoring and management agent — Breeze, Atera, PDQ Connect, GoTo Resolve, SimpleHelp, Level, Action1, and a dozen others — the situation is categorically worse than a plain remote-viewing tool, and here’s why.

A remote-control program like UltraViewer or AnyDesk is, at its core, a screen and a mouse. An RMM agent is an administrative channel. It is built from the ground up to run scripts unattended, transfer files silently, install and remove software, and reach in without the person at the desk being prompted or even aware. It runs as SYSTEM. It’s digitally signed by a real vendor. Endpoint security products trust it, because in 99 cases out of 100 it belongs to the IT department.

So when an attacker gets an RMM agent onto a machine, removing the ScreenConnect client accomplishes nothing durable. The RMM just pushes a new one, from a signed installer, over an outbound HTTPS connection that looks like every other management heartbeat on the internet.

This isn’t a theory I’m extrapolating from my own caseload, either. The published research this year has documented the same layered pattern repeatedly: threat actors abusing a legitimate management platform as the beachhead, then using it to deploy ScreenConnect or SimpleHelp as the persistent foothold. Cisco Talos has tracked initial-access brokers spinning up free-trial RMM accounts specifically for this. Huntress has been cataloguing renamed ScreenConnect binaries delivered under Social Security, invoice, and letter-of-invitation lures since 2025. Securonix documented a multi-wave campaign this past August using fake Adobe and Zoom update prompts to do the same thing. And in early September, researchers described attackers abusing the Faronics Deploy management platform — a real product, used by real schools and businesses — purely as a vehicle to install ScreenConnect on victim machines.

The tooling is legitimate. The signatures are valid. The traffic is boring. That’s the whole point.

One more wrinkle: the ones you can’t see in Programs and Features

Every ScreenConnect client on that desktop had been installed with a flag that suppresses its entry in the Apps & Features list. The owner went looking for it, exactly as you’d hope, and found nothing — because there was nothing to find in the place he knew to look.

Mechanically, this is the SystemComponent value being set to 1 under the product’s uninstall key. It’s a legitimate Windows feature intended for runtime components that shouldn’t clutter the list. In this context it’s a hiding place, and it’s the single best reason not to trust “I checked my installed programs and it’s clean” as a finding.

Finding Them Yourself

Now for the practical part. Everything below runs from an elevated PowerShell prompt on the affected machine.

Before you touch anything: disconnect the machine from the network first — pull the Ethernet cable or switch off Wi-Fi. If someone is connected at that moment, killing their session in front of them gives them a reason to do something destructive on the way out. I isolate every one of these before I start the removal work, without exception.

1. Look at the services. This is where these tools live, and it’s the fastest high-yield check. Check everything, searching for remote access tools you don’t recognize.

A ScreenConnect client, for instance, registers as ScreenConnect Client ( followed by a sixteen-character instance identifier — that identifier is the tell, because it maps to whoever’s relay server it phones home to. Four different identifiers means four different sessions, not one program installed four times.

2. Look for the hidden uninstall entries. This catches what Programs and Features won’t show you:

$keys = 'HKLM:\SOFTWARE\Microsoft\Windows\CurrentVersion\Uninstall\*',
        'HKLM:\SOFTWARE\WOW6432Node\Microsoft\Windows\CurrentVersion\Uninstall\*'
Get-ItemProperty $keys -ErrorAction SilentlyContinue |
  Where-Object { $_.SystemComponent -eq 1 } |
  Select-Object DisplayName, DisplayVersion, UninstallString | Format-List

Some legitimate runtimes appear here. Anything with a remote-access product name does not belong.

3. Sweep the rest of the persistence. Scheduled tasks, Run keys, and firewall rules are where many leftovers hide. Check these areas thoroughly for anything that was added by a tool you’ve identified in any of the other areas.

4. Check the things that get quietly modified. On a clean case these all come back empty; on a bad one, they’re where the real damage is:

Get-MpPreference | Select-Object -ExpandProperty ExclusionPath
Get-MpPreference | Select-Object -ExpandProperty ExclusionProcess
Get-Content $env:SystemRoot\System32\drivers\etc\hosts
netsh winhttp show proxy

Defender exclusions are the one I care about most. A carved-out exclusion path is somebody building a room your antivirus isn’t allowed to enter, and it is never accidental.

5. Remove, in this order. Stop the service, delete the service registration, then run the product’s own uninstaller using the UninstallString you pulled in step two:

sc.exe stop  "ScreenConnect Client (0000000000000000)"
sc.exe delete "ScreenConnect Client (0000000000000000)"

For MSI-based installs, the uninstall string will be an msiexec call with a product GUID; run it with /qn for a silent removal. Afterward, clean the install directories — C:\Program Files (x86)\ScreenConnect Client (…), %ProgramData%\AnyDesk, %APPDATA%\AnyDesk, C:\Program Files (x86)\UltraViewer, and their equivalents — and then re-run every query above from a fresh session. Don’t take the uninstaller’s word for it. I re-scan every machine after cleanup and compare it against the intake scan item by item, because a removal that reports success and a removal that is successful are two different things, and I’ve seen the gap often enough to never trust it.

Once you’re clean, reconnect to the network, run a full Defender scan, and verify real-time protection is on and definitions are current.

The Uninstall Is the Easy Half

This part is as important as the initial cleanup.

Getting the software off the machine is the part I can do for you. The accounts are the part only you can do, and it matters more than everything above combined. If someone had remote control of a computer for any length of time, treat every credential typed or stored on it as exposed. That means:

  • Change passwords from a different device. Your phone or a tablet is fine. Do not do it from the machine you’re not yet certain is clean.
  • Start with email, then your Microsoft and Google accounts, then banking, then everything with a stored card number. Email first, always — it’s the reset key for the rest.
  • Sign out of all active sessions explicitly. This is the step almost everyone misses. Changing a password does not always invalidate a session that’s already open. Google, Microsoft, Apple, and most banks all have a “sign out everywhere” or “sign out of all other sessions” control. Use it. Otherwise, a stolen cookie keeps working after the password change.
  • Check your mailbox rules and forwarding settings. Look for rules you didn’t create, especially ones that move or delete messages, and check that your recovery email address and phone number are still yours.
  • Turn on app-based two-factor authentication anywhere it’s offered. Authenticator app over SMS where you have the choice.
  • Give your password manager a new master password, since anything in the vault was reachable from that machine.
  • Tell your accountant, your bookkeeper, and anyone you regularly send or receive money from. If the mailbox was read, they are downstream of your incident whether they know it yet or not. And from here on, verify any change of payment instructions by phone, at a number you already had — not one printed in the email making the request.

One additional note on the theater of it: on one of these machines, about ninety minutes after the remote session began, someone launched CCleaner by hand and downloaded two copies of its support tool. That’s not incompetence. That’s a performance — visible “cleanup” software running on screen while the person watching feels reassured that something productive is happening. Treat any unsolicited “we’ll clean your computer” session as what it is.

What I Do About It, and Why My Clients Are in a Different Position

Two things make these cases go faster and end more conclusively for my customers, and both are mine.

The first is the Remote Access Guard built into the Triple-S Customer Panel, which I’ve now deployed across thousands of client machines. Without giving away the mechanism, it works in two layers that cover for each other: one keeps the download from happening in the first place, and the other doesn’t watch the browser at all — it watches Windows, and reacts the instant one of these tools registers itself with the operating system. It stops it, locks it out at the firewall, and tells the user plainly what it did. It records the prior state before it changes anything, so a family member’s legitimate remote-support tool can be put back exactly as it was. And it does all of this without a resident service or background process, which is a design constraint I hold myself to on everything I build: ride the infrastructure Windows already provides, and stay out of the user’s way. To my knowledge this is a rare offering in this industry, and I built it precisely because I got tired of cleaning the same machines twice.

The second is S-Ray, my own proprietary in-house diagnostic and analysis platform. It’s what turns four disconnected oddities into a single narrative. S-Ray correlates the installed software inventory, service registration timestamps, startup entries, running processes, live network connections, event log history, Defender detection and quarantine records, browser configuration, and driver state into one correlated picture, grades the machine’s risk posture, and — critically — lets me run the same analysis again at closeout and compare it against intake. That’s how I can tell a client with confidence that the first agent registered on May 15th and the fourth on May 29th, that one was still talking to an outside relay when the machine hit my lab, and that every component of all four is verifiably gone. It’s also how I catch the ones nobody reported: on one of these machines the remote-access stack was the presenting complaint, but S-Ray also surfaced a stalled firmware update, a wireless driver throwing faults twice a day, and a System Restore subsystem that had failed 122 consecutive times — meaning the machine had no rollback point at all.

A scan tells you what’s infected. A correlated timeline tells you what happened. Those are very different deliverables, and after twenty years of this work I am evolving my tooling faster than ever before.

Bottom Line

The remote-access scam has quietly become the most financially dangerous thing I see in this business, and it got there by getting simpler. There’s no exploit, no zero-day, no clever malware. There’s a convincing stranger, a legitimate piece of software, and a person who was trying to be helpful.

If you take three things from this:

  1. Nobody legitimate will ever contact you first and ask for remote access. Not Microsoft, not your bank, not Amazon, not Dell, not the Social Security Administration. Not once, not ever. That request, arriving unsolicited, is the entire scam in a single sentence.
  2. If you find one, assume there are more. It’s like finding a mouse (and they even build false nests in the same spirit). Check the service install history, not just the programs list.
  3. The cleanup doesn’t end the incident. The password and session work does. Do it from another device, and don’t skip the sign-out-everywhere step.

And if you’re staring at a machine right now wondering whether someone’s been on it, stop using it and get it looked at. Two hours of my time is considerably cheaper than the alternative trust me.


If you’re in the Louisville area and think someone may have had remote access to your computer — or you’ve already found one of these and want to be certain it’s the only one — give me a call. I’ve been doing this work since 2006, every machine is handled personally by me, and I’ll tell you exactly what happened and when, not just what got removed.

How S-Ray Diagnosed a Failing Backup Drive Without Ever Touching It

A client recently brought in their laptop for a routine tune-up — the kind of visit that happens when it’s been a few years and things just feel a little sluggish. They mentioned some printer issues in passing, but the machine was otherwise “fine.” No complaints about data, no mention of backups, no sense of urgency beyond the printer.

What they didn’t know — and couldn’t have known — was that their external backup drive was quietly dying.

Please note: this is from an early version of S-Ray, as impressive as it is. The system has since evolved substantially and its capabilities and interface are vastly improved over what is being described even here.

The Presenting Problem (and the Real One)

The laptop came in for printer troubleshooting and a full tune-up. Standard stuff. The printer issue turned out to have a clear root cause that I was able to identify and address during service. But the most important finding from this visit had nothing to do with the printer — and it involved a device that was never physically connected to the machine during my entire service window.

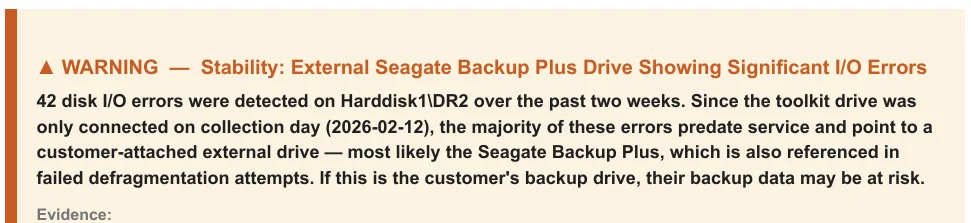
When I ran my S-Ray diagnostic analysis at intake, it flagged something unexpected: evidence of significant, recurring hardware failures on an external storage device — one that the client uses as their primary backup drive. The drive wasn’t plugged in. It was sitting at the client’s home. But the traces it had left behind in the system told a very clear story, and it wasn’t a happy one.

S-Ray identified a pattern of escalating failures on that drive over a two-week window leading up to the service visit. The system had also been unsuccessfully attempting maintenance operations on the drive, failing each time — further corroborating that something was seriously wrong with the hardware itself.

Why This Matters More Than Everything Else I Did That Day

Don’t get me wrong: the tune-up work I performed was valuable. Startup items were trimmed, updates were cleared, stability improved, bloatware was removed. The client’s machine is running measurably better across several key metrics. That’s the job, and I’m proud of the work as always.

But if that external drive fails before the client replaces it, none of that matters.

This is a backup drive. Presumably the only copy of whatever the client considers important enough to back up — family photos, financial documents, irreplaceable personal files. If that drive dies silently (and they almost always die silently), the client loses their safety net without ever knowing it was gone. The next time their primary drive has a problem, they’ll reach for the backup and find nothing — or worse, corrupted fragments of what used to be their data.

Professional data recovery on a failed external drive runs anywhere from $300 to $1,500 or more depending on the failure mode. And that’s assuming recovery is even possible. For drives with significant pre-existing I/O degradation — which is exactly what S-Ray identified here — the prognosis gets worse the longer you wait.

I’ve been doing data recovery work with professional-grade equipment since around 2012 (about six years into my business tenure). I know exactly what a drive in this condition looks like when it finally arrives on my bench six months too late. The conversation is never fun.

What Makes This Different

Any competent technician can tell you a drive is failing if you hand them the drive. Plug it in, run CrystalDiskInfo or a SMART check, and the numbers speak for themselves. That’s not special — it’s table stakes.

What happened here is fundamentally different. The drive was never connected during service. No technician could have run a health check on it because it wasn’t there. At any other shop, this visit would have ended with a faster-booting laptop and a fixed printer, and the client would have gone home with no idea that their backup infrastructure was degrading.

S-Ray caught it because it doesn’t just look at what’s in front of it — it analyzes the history of the system’s interactions with every device it’s touched. The laptop remembered what happened with that external drive over the preceding weeks, and S-Ray knew how to read those signals, correlate them, and flag the pattern as a genuine risk.

I contacted the client about the finding and recommended we examine the drive before it’s too late. That’s a conversation that could save them hundreds or thousands of dollars — or, more accurately, save them from the kind of loss that money can’t always fix.

The Uncomfortable Truth About Preventive Maintenance

Most computer service visits are reactive. Something breaks, you bring it in, someone fixes the broken thing, you go home. The fundamental problem with this model is that it can only address what you already know is wrong.

The most dangerous problems are the ones you don’t know about yet — the ones festering below the surface, accumulating damage in small increments that don’t trigger any visible symptoms until the day they trigger a catastrophic one. I’ve written about this concept before in other contexts (orphaned kernel drivers from uninstalled security software being a recent favorite example), but it applies nowhere more directly than to storage devices.

A drive often doesn’t go from “perfectly healthy” to “dead” overnight. It degrades. It throws errors. It retries operations. It reallocates sectors. These signals are there for anyone who knows where to look — but if nobody’s looking, they go unnoticed until the drive crosses the threshold from “degrading” to “unrecoverable.”

S-Ray is designed to look. Automatically, exhaustively, and — as this case demonstrates — even at devices that aren’t physically present during the analysis. This isn’t a bunch of buzzwords; this system was built from the ground up, and it leverages carefully-trained LLM data traversal, supplied with rich system history and 15+ years of pattern-building logs, to surface concerns that would otherwise slip right through the cracks. It has taken years to reach its current form, and as of 2026, I’m now actively using it to help diagnose client machines.

The Big Takeaway

The most valuable finding from this service visit was something the client never asked about, involving a device that was never connected, identifying a failure that hadn’t fully happened yet. That’s the difference between reactive repair and genuine diagnostic intelligence.

In this case, the client’s drive was indeed failing, and S-Ray properly correlated it with a particular drive (the Seagate Backup Plus) the client and I purchased together several years prior (whose records we had on file), naming it specifically in the diagnosis. Impressive as this is, the best part was the result: since the Seagate was still in the early stages of mechanical failure, I was able to image the entire drive and copy his data to a new 1 TB Samsung T7 Portable SSD. No data was lost, and S-Ray was the reason.

I built S-Ray because I got tired of handing machines back to clients knowing there might be something I missed — not because I wasn’t thorough, but because the sheer volume of system telemetry exceeds what any human can manually review in a reasonable service window. Every machine I service now gets the same exhaustive automated analysis, and findings like this one are exactly why.

If you’re in the Louisville area and want your machine examined by someone who looks deeper than the surface, give me a call. I’ve been doing this since 2006, and I’m still finding new ways to do it better.

The Hidden Cost of “System Optimization”: When Your Security Software Becomes the Threat

A client recently brought me a laptop with what seemed like a simple problem: persistent notification spam. What I found underneath was a textbook example of why the endless pursuit of system optimization and reactive third-party security products so often ends up being a net negative—and why I’ve been warning clients about this for many years.

The Presenting Problem

The machine came in for notification spam. Annoying, sure, but usually straightforward. Upon deeper inspection, however, I discovered a constellation of far more serious issues lurking beneath the surface—problems the client had no idea existed, and problems that would have eventually surfaced in spectacular fashion had they not been addressed.

The culprit? iolo System Mechanic Ultimate Defense—a product that, despite its confident marketing messaging, had quietly installed itself at the deepest levels of the operating system and left behind sophisticated low-level components that were actively destabilizing the system.

The Deeper Discovery

Here’s where things got interesting—and by interesting, I mean concerning.

iolo System Mechanic Ultimate Defense bundles a third-party antivirus component: specifically, the Avira Endpoint Protection SDK. This is the same SDK used by F-Secure and other enterprise security products. The problem is that when iolo is uninstalled through normal means, these deeply embedded components often remain behind—broken, orphaned, yet still attempting to function.

When I attempted an initial cleanup and uninstallation of the iolo package, the system exhibited alarming behavior: following a reboot, Windows was unable to initialize the PIN login interface, effectively rendering the machine unbootable in its normal state. Fortunately, because I’m meticulous in my approach, I had created a system restore point before beginning any work. I was able to revert to this restore point to recover the system and investigate further.

What I found was deeply concerning. The following low-level components were discovered still active on the system despite the parent software having been “uninstalled”:

  • Early Launch Anti-Malware (ELAM) drivers (rtp_elam.sys) — These load before almost anything else during the boot process, specifically designed to be nearly impossible to remove or bypass
  • Real-time protection kernel drivers (rtp1.sys, rtp2.sys, BdSentry.sys) — Sitting in the path of critical data flows, filtering information traveling through the system
  • Network filter drivers (BdNet.sys, netprotection_network_filter, netprotection_network_filter2) — Intercepting and inspecting network traffic at the driver level
  • Orphaned services (EndpointProtectionService, EndpointProtectionService2) — Still registered and attempting to run despite their parent application being gone
  • Remnants from previous McAfee installations (McAfeeIntegrationDriver, mcafeeintegrationservice) — Because of course there were

These components operate at the very foundation of the operating system. When they’re orphaned and broken, they can cause all kinds of random issues—particularly when Windows attempts a major build upgrade or when certain programs attempt to install or update.

The analogy I often use is mold behind a wall: even if you don’t see it, it can become a serious problem. And ignoring it only allows it to grow… sort of like that (excellent) children’s book, There’s No Such Thing as a Dragon.

The Intervention

After creating a complete forensic image of the internal drive as a safety net (a non-negotiable step before any high-risk intervention), I booted the system into Safe Mode and loaded Farbar Recovery Scan Tool (FRST)—an advanced diagnostic and remediation tool that I’ve used for well over a decade, tracing its lineage back to earlier tools like OTL and HijackThis, or even the scripting side of the old-school ComboFix. FRST allows for precise, surgical removal of deeply embedded components that cannot be addressed through conventional means.

This is expert-level intervention that carries inherent risk—but it was necessary to fully remediate the system. Following the removal of the orphaned drivers and services, I repaired underlying Windows component store corruption using DISM and SFC, performed an in-place upgrade to Windows 11 25H2, removed additional malicious browser extensions that had piggybacked on the situation, and applied my full optimization protocol.

The machine is now running beautifully. But the experience reinforced a lesson I’ve been preaching for years.

Why This Keeps Happening

The unfortunate reality is that most people (including tech publications/writers, reviewers, etc) simply have no idea what they’re talking about when it comes to these “optimization” and “security” tools. Rarely do these people burrow so deeply into the annals of their operating system that they witness the foundational destruction these products can inflict. Even if they do, they often never successfully trace the problem back to its source—and when Windows refuses to boot one day following an update, they chalk it up to “stupid Windows broke itself” rather than recognizing a problem they created long ago by running a tool with the best of intentions.

If this next part sounds familiar, I wrote about this very topic some 14 years ago, and I even name-dropped System Mechanic way back then as a primary culprit. Microsoft has explicitly stated that they do not support any system that has had its registry “cleaned.” Mark Russinovich—the foremost expert on Windows internals, creator of Sysinternals, and now a Technical Fellow at Microsoft—has called registry cleaners “some of the most dangerous tools” in common use. There is no need to “clean” the registry; it is quite small by today’s memory standards and, more importantly, much like human DNA, it is simply not possible to know what information stored therein is “junk.”

And yet these products persist, because they appeal to a very human desire: the promise that you can “optimize the heck out of everything” and “squeeze every last bit of performance” out of your machine with a single click.

The Third-Party Antivirus Problem

But it’s not just optimization tools. Third-party antivirus products can often present a similar—and arguably more insidious—problem.

Modern third-party antivirus products achieve their protection by burrowing deeply into Windows in ways that closely resemble sophisticated malware behavior. They must operate at the foundation (“Ring 0”) of the operating system, filtering all information flowing through your system, intercepting network traffic, and loading as early as possible in the boot process.

Sound familiar? It should. These are the exact same techniques used by the sophisticated rootkits I spent years removing in the late 2000s and early 2010s—threats like TDSS (TDL3/TDL4) that infected low-level system drivers (atapi.sys and others) and the master boot record (MBR) specifically so they could load before defenses could detect or stop them.

The closest current equivalent to those sophisticated rootkits is, ironically, antivirus software itself.

The trust problem this creates is substantial. How much can you realistically trust the smattering of many dozens of popular antivirus products, given their privileged position inside the OS and their access to sensitive data? Vendor incentives are necessarily misaligned with user incentives: vendors want to make money, retain subscribers, and continually “prove value.” Users just want their systems to work reliably without interference. Forgiving any ethical misgivings, even the best-intentioned products still by their very nature expand the attack surface by introducing new kernel hooks that can be exploited by motivated attackers. And, naturally, they also expand the complexity of software stack as a whole, which by the very logic of systems engineering means a greater proclivity for errors/crashes/stability and performance problems.

Even if these products catch a fractional additional percentage of threats beyond what Windows Defender catches, the net negative—in terms of system stability, complexity, and expanded attack surface—is often substantial.

The Better Path Forward

Windows Defender is now on par with some of the best commercial antivirus packages available. It’s completely free, written by Microsoft, included with every Windows installation, and—critically—it doesn’t introduce the instability, complexity, and attack surface expansion that third-party products bring to the table.

Combined with sensible browser protections (such as content filtration with properly configured filter lists or similar layered approaches via defense in depth), prudent security habits, and attack surface reduction as a primary strategy, you have robust protection without the hidden costs.

The biggest thing I do for my clients isn’t installing more software—it’s reducing the attack surface. Targeted, surgical expertise applied to the actual problems at hand, not blanket “scan and fix” approaches that do not work for complex systems like Windows.

The Big Takeaway

If there’s one thing I want you to remember from this case study, it’s this: the pursuit of endless optimization and reactive security through third-party products is very often a net negative. These tools achieve their functionality by integrating themselves at the deepest levels of your operating system—and when things go wrong (and they will), the problems they create are often invisible until they manifest catastrophically.

The machine I serviced would have eventually failed during a Windows build upgrade, or a critical software installation, or some other stressful process. The client would have blamed Windows or the manufacturer of their laptop. They would have had no idea that the real culprit was a product they installed years ago with the best of intentions.

Don’t let that be you. Resist the temptation to micromanage your system with one-click cleanup tools. Trust Windows Defender. And if you do find yourself dealing with the aftermath of one of these products, find someone who knows how to surgically remove the damage without causing more (spoiler alert: there aren’t very many of us around).

If you’re in the Louisville area and dealing with a system that’s been compromised by “optimization” tools, third-party security products, or anything else, give me a call. This is exactly the kind of work I specialize in—and I’ve been doing it since 2006.
When RAID-6 Goes 6 Under: A Six-Drive Recovery Success Story

When an enterprise business, government-adjacent client recently contacted me about a completely failed RAID array, I initially expected another somewhat straightforward RAID-5 recovery. What I discovered instead was a RAID-6 configuration with multiple drive failures that would push both my equipment and expertise to their limits—and showcase exactly why professional data recovery equipment makes all the difference.

What Went Wrong?

The client had been running what they believed was a RAID-5 array (single drive redundancy) using six Seagate 3TB drives. However, upon inspection, I discovered this was actually a RAID-6 configuration—which theoretically offers two-drive failure tolerance. Unfortunately, theory and reality don’t always align when you’re dealing with multiple compromised drives and missing RAID parameters.

Here’s what I was facing:

  • Drive 4: Completely dead—wouldn’t ID, never read a single sector
  • Drive 5: Severely compromised and required intensive recovery procedures
  • Drive 6: Failing with critical RAID metadata corruption at the end sectors
  • Missing RAID Parameters: No documentation of stripe size, drive order, or configuration details

The situation was further complicated by the fact that even though RAID-6 can theoretically handle two drive failures, I had three drives with significant issues—and the two “good” recovered drives still weren’t perfect images.

The Recovery Process

Step 1: Professional Drive Imaging

Before attempting any reconstruction work, I removed all six drives from the enclosure and connected them individually to my DeepSpar Stabilizer 10Gb systems for diagnosis and forensic imaging. This is absolutely critical—you get exactly one chance to extract data from failing drives before they potentially die completely.

For drives 1, 2, 3, and 6, the process was relatively straightforward:

  • Connected each drive to DeepSpar Stabilizer 10Gb
  • Conducted Express Diagnostics
  • Disabled SMART and other heavy processes that could stress failing drives
  • Performed sector-by-sector forensic imaging from sector 0 to max LBA
  • Monitored progress and handled troubled areas strategically

Drive 6 presented complications with failing sectors at the end of the drive—exactly where critical RAID configuration data is typically stored. This explained the array’s initial failure symptoms.

Step 2: The Challenge of Drive 5

Drive 5 proved to be the most problematic, requiring escalation to my DeepSpar Disk Imager for intensive recovery work:

  • Built a complete heads map using firmware diagnostics
  • Performed media testing to isolate potential head failures
  • Connected terminal leads for low-level firmware manipulation
  • Manually cleared the G-List and SMART data via terminal commands
  • Regenerated the drive’s translator tables
  • Configured sophisticated multi-pass imaging algorithms using R-Studio Technician

This process required multiple iterations as the drive continued degrading. Each pass collected additional data using different recovery strategies—forward reading, backward reading, and various algorithmic approaches to coax data from failing sectors.

After roughly one week of intensive work, I successfully recovered over 96.5% of the data from this drive. For a drive that initially appeared completely unrecoverable, this was remarkable.

Step 3: RAID Reconstruction Challenges

With forensic images of five drives (Drive 4 remained completely unrecoverable), I began the complex process of RAID-6 reconstruction. This proved exceptionally challenging because:

  • The missing Drive 4 eliminated one level of redundancy
  • Drives 5 and 6 both had imperfect sectors in critical areas
  • RAID parameters were completely unknown
  • Partition data on Drive 6 was inconsistent with Drive 5

Step 4: Parameter Discovery and Final Recovery

Through methodical testing of different RAID configurations and extensive analysis of the available drive data, I eventually discovered the correct parameters. However, even with proper RAID reconstruction, approximately 10% of files showed corruption due to the multiple drive compromises.

At this point, I made a critical decision to investigate alternative RAID parameter configurations. During the client’s file transfer process, I discovered additional parameter adjustments that dramatically improved reconstruction quality.

The result? A near-100% successful recovery of all client data.

The Technical Reality: Why This Was So Complex

RAID-6 arrays use sophisticated mathematical algorithms (typically Reed-Solomon error correction) to calculate parity across multiple drives. When you lose the exact configuration parameters AND have multiple drives with read errors in critical areas, reconstruction becomes exponentially more difficult.

Key factors that made this recovery especially challenging:

  1. Triple Drive Compromise: While RAID-6 can handle two drive failures, having three problematic drives pushes beyond design limits
  2. Metadata Corruption: Critical RAID configuration data was compromised on multiple drives
  3. Parameter Discovery: Without known stripe size, drive order, and parity configuration, I had to test dozens of combinations
  4. Sector-Level Precision: Even small gaps in critical areas can render entire file sets unrecoverable

Prevention and Lessons Learned

This case reinforces several critical points about RAID storage:

  • Document Your RAID Configuration: Always maintain records of stripe size, drive order, and configuration details
  • Monitor Drive Health Proactively: Regular SMART diagnostics can identify failing drives before array failure
  • Backup Beyond RAID: RAID is NOT backup—maintain separate backup systems for critical data
  • Professional Recovery Equipment Matters: Consumer recovery software would have been completely useless in this scenario

The Bottom Line

Professional data recovery isn’t just about having the right software—it’s about having enterprise-grade hardware specifically designed for failing drive recovery, combined with the experience to navigate complex multi-drive failure scenarios.

In this case, the combination of DeepSpar professional recovery equipment, advanced RAID reconstruction software, and systematic parameter discovery made the difference between total data loss and successful recovery.

Facing a failed RAID array or critical data loss? Don’t attempt multiple recovery software programs or reinitialize drives—these actions can make professional recovery impossible. Contact a professional with the right equipment before it’s too late.


If you’re looking for computer help in the Louisville area, look no further. I’ve been successfully recovering data from failed RAID arrays since 2006—call me today and get it done right the first time!

CASE STUDY: When Precision Undervolting Saves a $1,000+ Motherboard Replacement

Advanced GPU voltage tuning as a diagnostic tool and workaround for marginal hardware

Here’s a case that perfectly illustrates why methodical, evidence-based diagnostics can mean the difference between a catastrophic repair bill and an elegant engineering solution. Sometimes the most sophisticated problems require the most sophisticated solutions—and this particular Lenovo Legion Pro 7 gaming laptop stretched my knowledge about the intersection of thermal management, voltage regulation, and component-level failure analysis.

The Problem: High-Performance Gaming Laptop with Escalating Failures

A client brought me their top-tier gaming machine—a Lenovo Legion Pro 7 16IRX8H equipped with an Intel 13th-gen Core i9 and NVIDIA RTX 4080 laptop GPU. The symptoms were classic but troubling: intermittent system lockups during graphically intensive tasks, with the dedicated GPU seemingly “vanishing” from the system entirely. The client had already performed extensive software-level troubleshooting, correctly isolating the issue to what appeared to be hardware failure.

This wasn’t a case of simple thermal throttling or driver corruption. This was a machine that would run perfectly for minutes or hours, then suddenly lock up completely during gaming or GPU-accelerated workloads. When it did lock up, the NVIDIA GPU would disappear from Device Manager entirely until a full power cycle.

Further complicating matters was the fact that the board (with included dedicated NVIDIA GPU) was over $1,000 for this unit, and the client was (understandably) not particularly interested in replacing it (since, labor and all, we’d have easily been in the $1,300 range when all was said and done—ouch).

Initial Assessment: Following the Evidence Trail

My initial inspection revealed severe thermal compromise—the laptop’s cooling system was heavily obstructed with dust and debris, creating dangerous thermal conditions that were undoubtedly contributing to instability. However, experienced technicians know that thermal issues alone rarely cause GPUs to completely disappear from the system bus.

I performed a complete thermal service: full teardown, heatsink removal, cleaning of the thermal compound that had “pumped out” from the processor dies, and reapplication of high-performance Arctic Silver MX-6. This addressed the obvious thermal problems, but as suspected, the core instability persisted even with pristine temperatures.

The Diagnostic Deep Dive: When Standard Approaches Fail

With thermal issues eliminated and a fresh Windows installation ruling out software problems, I moved into advanced diagnostic territory. Using HWiNFO64 for comprehensive system monitoring, I began logging dozens of parameters during stress testing to capture the exact moment of failure.

This is where AI-powered log analysis proved invaluable—pattern recognition across massive datasets revealed what manual analysis might have missed. The evidence was conclusive: the instability wasn’t purely thermal, but was triggered by voltage instability in the dedicated RTX 4080 GPU.

Specifically, when the GPU attempted to boost to its maximum performance state, it would request voltages in excess of 0.975V—a voltage level that a marginal component within either the GPU die itself or its immediate power delivery system (VRMs) simply couldn’t handle reliably. This would cause an instantaneous hardware-level failure, resulting in system lockup and GPU disappearance.

The Engineering Solution: Precision Software Workaround

Here’s where things get interesting. A traditional repair approach would involve motherboard replacement—easily $1,000+ in parts and labor for a machine of this caliber. However, understanding the specific failure mechanism opened the door to a sophisticated software-based solution that may well provide durable for years to come (if we’re lucky).

I implemented a two-part precision workaround:

1. Precision Voltage Limiting via MSI Afterburner

I established a definitive maximum voltage limit of 875 millivolts (0.875V) for the GPU—exactly 100mV below the failure threshold identified through testing. This creates an electronic “guardrail” that prevents the GPU from ever requesting the unstable voltage state that triggers the crash.

The beauty of this approach is that it’s not just preventive—it’s actually, in some ways, performance-optimizing. By preventing the GPU from reaching inefficient, high-voltage states, the chip can maintain higher, more stable boost clocks within its power envelope.

2. Boot-Safe Graphics Mode Implementation

The secondary issue of warm restart hangs required addressing the boot sequence. In “Discrete Graphics” mode, the BIOS attempts to initialize the problematic GPU before Windows loads—and before MSI Afterburner can apply protective voltage limits.

By configuring the system for “Hybrid Mode” (NVIDIA Optimus), the laptop boots using the integrated Intel graphics, leaving the discrete GPU dormant until Windows fully loads and Afterburner applies its protective voltage profile. This completely eliminates boot-related hangs.

Performance Validation: No Compromises

The proof is in the benchmarks. Post-repair stress testing showed:

  • Sustained GPU clocks: 2223 MHz average during extended stress testing
  • Full power utilization: 169W power draw (maximum spec)
  • Benchmark scores: 10,831 in Unigine Superposition 4K Optimized—solidly in the upper range for laptop RTX 4080s
  • Temperature management: Safe operating temperatures throughout testing

The undervolt isn’t necessarily a performance reduction—it’s efficiency optimization that can in some cases allow the GPU to maintain higher clocks more consistently within its thermal and power constraints.

The Broader Implications: When Component-Level Tolerances Fail

This case highlights a crucial reality in modern high-performance computing: manufacturing tolerances create edge cases where individual components may not reliably handle their own specified operating parameters. Silicon lottery effects, minor VRM variations, and microscopic manufacturing defects can create these “marginal component” scenarios.

For fellow technicians, this represents a diagnostic approach that can salvage hardware that would otherwise require costly replacement:

  1. Comprehensive logging during failure conditions
  2. Voltage-specific stress testing to identify failure thresholds
  3. Precision software limiting to create stable operating envelopes
  4. Boot sequence modification to prevent pre-OS failures

For laptop owners, this demonstrates why sometimes defective or degraded hardware can still be tolerated under very specific limits/guardrails, intelligently imposed upon the system after careful analysis and planning.

The Long-Term Perspective: Managing Marginal Hardware

I was transparent with the client about the nature of this solution. While highly effective, this is a workaround for marginal hardware, not a cure for defective hardware. With any luck, the machine will remain stable indefinitely under these conditions, but it’s impossible to guarantee that the underlying marginal component won’t degrade further over time.

The critical requirements for long-term stability:

  • MSI Afterburner must launch with Windows to apply voltage protection
  • Hybrid Graphics Mode must remain enabled to prevent boot hangs
  • Profile preservation (saved to slot #1 for easy recovery if settings are lost)

It’s worth noting that this type of diagnostic work relies heavily on advanced tooling and methodology that are probably beyond the scope of the vast majority of repair shops. Comprehensive system monitoring, AI-assisted log analysis, and precision voltage tuning require both specialized software and the experience to interpret complex datasets.

For the client, this represented a complete repair for the cost of labor alone—no parts, no motherboard replacement, no data migration headaches. The machine now performs at its full potential while remaining completely stable—nearly a year after the initial repair. The total cost? In this case, around $350.

The Bottom Line

Sometimes the most expensive problems have the most elegant solutions—if you know where to look. Modern diagnostic techniques, combined with deep understanding of component-level behavior, can often salvage hardware that conventional approaches would simply replace.

This Lenovo Legion Pro 7 is now running as a stable, top-tier gaming machine. The client avoided a massive repair bill, kept their familiar system configuration, and gained insights into the sophisticated engineering that goes into true technical problem-solving.

As always, this type of advanced diagnostic and repair work requires professional-grade tools and expertise. While the principles are educational, attempting voltage modifications without proper understanding and monitoring equipment can result in permanent hardware damage.

If you’re dealing with intermittent system instability, GPU disappearance issues, or other complex hardware problems in the Louisville area, don’t assume the worst-case scenario. Sometimes there’s a better solution—you just need the right diagnostic approach to find it.

The Case of the Vanishing 8TB: A RAID-0 Recovery Adventure

When a client recently brought me a completely non-functional TRIPP-LITE RAID enclosure, I knew I was in for an interesting afternoon. What started as a routine data recovery job quickly turned into one of the more technically exotic cases this month—and a perfect example of why RAID-0 arrays can be both a blessing and a curse.

What Went Wrong?

The client had been using an external dual-drive RAID enclosure that suddenly stopped working. After some initial troubleshooting, they discovered they had two 4TB drives configured in RAID-0 (striped array), giving them 8TB of total capacity with improved performance—but zero redundancy.

Here’s where things got complicated:

  • Multiple Recovery Attempts: The client had already tried several recovery tools, including Stellar recovery software, which could only find file headers with no recoverable content
  • Accidental Initialization: In a moment of desperation, they accidentally initialized the array using macOS, effectively wiping critical RAID metadata from both the beginning and end of the drives
  • Missing Documentation: The RAID parameters for this particular enclosure model weren’t published anywhere—meaning I was working completely blind

The Recovery Process

Step 1: Forensic Imaging

Before touching the original drives, I removed them from the enclosure and connected each to professional DeepSpar disk imagers. This created bit-perfect forensic copies of both drives, ensuring that no additional data could be lost during any recovery attempts (it’s the first and most critical step leading into logical data recovery work in these scenarios). One of the drives was mechanically unstable, which explained why the array had begun experiencing issues to begin with. Some quick firmware modifications, disabling of SMART, and some other prep work rendered imaging with my world-class hardware and software tools relatively uneventful however.

Step 2: RAID Parameter Hunting

With the images safely stored, I began the painstaking process of determining the original RAID configuration. Using R-Studio Technician and UFS Explorer Professional Recovery software, I scanned the entire 8TB array trying to interpolate the stripe pattern.

I tested every conventional RAID-0 configuration:

  • Different stripe sizes (from standard 64KB down to uncommon smaller sizes)
  • Various drive orders
  • Different offset calculations

Step 3: The Breakthrough

After working through the weekend testing dozens of parameter combinations, I finally discovered the culprit: an extraordinarily rare 512-byte stripe size. Most RAID-0 arrays use stripe sizes of 64KB or larger—this tiny “hairline” stripe was so uncommon that my initial automated scans completely missed it.

Once configured correctly, the data structure suddenly became readable again.

Step 4: Data Extraction and Organization

The successful RAID reconstruction revealed approximately 5.83TB of recoverable data spanning nearly two decades (2005-2025).

The Technical Challenge: Why This Was So Difficult

RAID-0 arrays present unique recovery challenges because data is literally scattered across multiple drives in a very specific pattern. Without knowing the exact stripe size, drive order, and offset parameters, the data appears as complete gibberish.

In this case, several factors made recovery especially complex:

  1. Exotic Stripe Size: The 512-byte stripe size is virtually unheard of in modern RAID implementations.
  2. Metadata Destruction: The macOS initialization wiped the RAID configuration data that might have provided clues.
  3. Previous Recovery Attempts: Multiple scanning passes had created additional wear on the drives.

The Silver Lining

Despite the multiple complications, I achieved 100% data recovery with no apparent file corruption. The client’s years of digital memories, business files, and critical documents were completely intact.

Key lesson: While RAID-0 offers performance benefits, it doubles your failure risk compared to a single drive. For critical data, consider RAID-1 (mirroring) or a proper backup strategy instead.

Prevention Tips

If you’re using RAID-0 for performance:

  • Maintain regular backups to a separate, non-RAID storage system
  • Document your RAID parameters (stripe size, drive order) for future reference
  • Consider RAID-10 for both performance and redundancy
  • Monitor drive health regularly using SMART diagnostics

Bottom Line

This recovery demonstrates that even seemingly hopeless data loss situations can often be resolved with the right tools, expertise, and persistence. However, the best data recovery is the one you never need—proper backups and redundant storage remain your first line of defense.

If you’re dealing with a failed RAID array or other data loss emergency, don’t attempt multiple recovery tools or reinitialize drives. Professional recovery services can often salvage data that appears completely lost—but only if further damage is avoided.

SOLUTION: Skip Microsoft Account Requirement During Windows 11 24H2 Fresh Install

If you’re installing Windows 11 24H2 from scratch and want to use a local account instead of being forced into a Microsoft account, you’ve probably hit this roadblock. Microsoft has made it increasingly difficult to avoid their cloud-connected ecosystem during setup, but there’s still a straightforward workaround.

What Changed?

Starting with Windows 11 22H2 and continuing through 24H2, Microsoft removed the obvious “I don’t have internet” or “Skip for now” options during OOBE (Out-of-Box Experience). The setup process now aggressively pushes users toward creating or signing into a Microsoft account, claiming it’s required for “the best experience.”

While Microsoft accounts offer legitimate benefits like cloud sync and enhanced security features, many users prefer local accounts for privacy, simplicity, or corporate policy reasons.

The Fix: Bypass Network Requirements Entirely

The solution leverages a built-in Windows command that disables the network requirement during setup, which then allows local account creation.

Step-by-Step Process:

  1. Boot from your Windows 11 installation media and proceed through setup normally
  2. When you reach the “Let’s connect you to a network” screen, press Shift + F10 to open Command Prompt
  3. Type the following command and press Enter: oobe\bypassnro
  4. Your system will automatically restart and return to the network selection screen
  5. You’ll now see a “I don’t have internet” option – click it
  6. Choose “Continue with limited setup” when prompted
  7. Create your local account as normal

Why Choose a Local Account?

Several legitimate reasons exist for preferring local accounts:

Privacy Control: Local accounts don’t sync data to Microsoft’s cloud services, giving you complete control over what stays on your machine.

Corporate Requirements: Many businesses require local accounts for compliance or security policy reasons.

Simpler Troubleshooting: Local accounts eliminate cloud authentication as a potential failure point during system recovery.

Reduced Dependencies: Your login credentials remain functional even without internet connectivity.

Legacy Software Compatibility: Some older enterprise applications work more reliably with traditional local accounts.

Most of these features can be selectively enabled later by signing into specific Microsoft services without converting your account type.

Security Considerations

Local accounts require more manual security management. Ensure you:

  • Use a strong password and security questions
  • Enable BitLocker disk encryption manually if needed – and be sure to backup your BitLocker Recovery Key!
  • Configure Windows Update to stay current with security patches

Bottom Line

The oobe\bypassnro command simply disables a configuration flag that makes internet connectivity appear mandatory during setup. Microsoft hasn’t removed local account capability – they’ve just made it less obvious to find.

This approach gives you full control over your Windows 11 installation while preserving the option to add Microsoft services later if your needs change.

Note: This method works on Windows 11 24H2 as of August 2025. Microsoft occasionally updates OOBE behavior, but the underlying bypass mechanism has remained consistent across multiple feature updates.

SOLUTION: 0x80070035 – “The network path was not found” on Windows 11 24H2

If you’ve recently upgraded to Windows 11 24H2 and suddenly can’t access your NAS or another PC’s shared folders, you’re not alone. Microsoft quietly hardened SMB (Server Message Block) security defaults in this release, and one side effect is the dreaded:

Error Code: 0x80070035The network path was not found

What Changed?

Starting in 24H2, Windows now requires SMB signing (digitally signing every SMB packet) by default on both the client and server roles. While this makes sense in enterprise environments, many home users and small businesses still have older NAS devices, media servers, or peer‑to‑peer Windows PCs that either:

  1. Don’t understand SMB signing at all, or
  2. Support it but can’t negotiate it quickly enough.

The result is that Windows drops the connection before the remote share ever responds, and you get a network path error instead of an authentication prompt.


The Fix: Make SMB Signing Optional Again

You don’t have to turn SMB signing completely off (though you can). Simply tell Windows: “Don’t require it—use it if both sides support it.” There are three easy ways to do that.


1. PowerShell (One‑Liners)

Run PowerShell as Administrator and paste:

# Relax signing requirement for inbound (server) and outbound (client) SMB
Set-SmbServerConfiguration -RequireSecuritySignature $false -Confirm:$false
Set-SmbClientConfiguration -RequireSecuritySignature $false -Confirm:$false

If you’re stuck with a legacy NAS that breaks even with optional signing, also run:

Set-SmbServerConfiguration  -EnableSecuritySignature $false -Confirm:$false
Set-SmbClientConfiguration -EnableSecuritySignature $false -Confirm:$false

That disables automatic signing entirely.


2. Batch File

Save this as Fix-SMBSigning.bat, right‑click Run as Administrator:

@echo off
setlocal EnableDelayedExpansion
set "alert="

for %%K in ("HKLM\SYSTEM\CurrentControlSet\Services\LanmanServer\Parameters"
"HKLM\SYSTEM\CurrentControlSet\Services\LanmanWorkstation\Parameters") do (
for /f "tokens=3" %%V in ('reg query %%K /v RequireSecuritySignature 2^>nul ^| find "REG_DWORD"') do if /i "%%V"=="0x1" (
if not defined alert echo Disabling SMB Signing Requirement & set alert=1
reg add %%K /v RequireSecuritySignature /t REG_DWORD /d 0 /f >nul
)
)
endlocal

:: Uncomment these lines if you want to force a restart of SMB services immediately
:: net stop lanmanserver /y & net start lanmanserver
:: net stop lanmanworkstation /y & net start lanmanworkstation

3. Direct Registry Import

If you prefer a .reg file, paste the following into Notepad and save as DisableSMBSigning.reg, then double‑click:

Windows Registry Editor Version 5.00

[HKEY_LOCAL_MACHINE\SYSTEM\CurrentControlSet\Services\LanmanServer\Parameters]
"RequireSecuritySignature"=dword:00000000

[HKEY_LOCAL_MACHINE\SYSTEM\CurrentControlSet\Services\LanmanWorkstation\Parameters]
"RequireSecuritySignature"=dword:00000000

Reboot or restart the LanmanServer and LanmanWorkstation services for the change to take effect.


Why Not Leave SMB Signing On?

If you’re in a corporate environment with Active Directory, you should leave SMB signing required. But for home and small‑office setups—especially with devices that can’t handle it—the risk of disabling the requirement is minimal as long as you’re on a trusted LAN (which I’m sure your home network is… hopefully).

SMB signing defends against man‑in‑the‑middle attacks by cryptographically verifying every packet. If all your devices are inside a secured network, that’s probably not a major concern.


Bottom Line

The 24H2 update didn’t break the connection to your NAS; it simply enforced a security feature your hardware can’t handle. Loosening that requirement restores normal behavior.

If you’re still seeing 0x80070035 after applying one of the fixes above, double‑check:

  • Firewall isn’t blocking File and Printer Sharing (SMB‑In)
  • The remote device is actually reachable (ping its IP)
  • Correct share permissions are in place

SOLUTION: “Windows cannot connect to the printer. Operation failed with error 0x0000011b”

Well, it’s not often I bother to write up a new blog post these days, but when I do, you know it’s something particularly irritating that I’ve decided to save you the trouble of solving on your own. This problem absolutely qualifies.

When attempting to share a printer over the network from one Windows 10/11 machine to other Windows 10/11 machines, the above error now often appears.

Myriad “solutions” across the internet exist, most of which involve uninstalling particular Windows hotfixes (KBxxxxxx) or manually adding the printer port. Problem is, none of these solutions actually work anymore. The problem was initially caused by Microsoft’s need to patch PrintNightmare and other related vulnerabilities in the Windows printer subsystem. These workarounds previously sufficed, but some situations require a more surgical approach now. Because if you attempt to simply roll back the patches, not only is that a temporary solution, it actually winds up forcing an install of the generic Microsoft Enhanced Point and Print driver instead of the correct one for the printer… which results in endless pages of gibberish being printed instead.

So here’s the actual solution: manually configuring group policies on affected machines (both client and “server”). The way to accomplish this is by using registry edits, because on any machine not running “Pro” editions of Windows, the Group Policy editor is MIA.

After lots of trial and error, here is the final version of the registry patch I used on all affected machines (again, client and server/sharing machine) to correct the problem. Simply reboot after applying the patch, reinstall the printer (by discovering over the network via Windows Explorer > Network on the client workstations), and you’re done.

Open Notepad, and save a new .reg file with the following contents:

Windows Registry Editor Version 5.00

[HKEY_LOCAL_MACHINE\SOFTWARE\Policies\Microsoft\Windows NT\Printers\PointAndPrint]
"InForest"=dword:00000000
"NoWarningNoElevationOnInstall"=dword:00000001
"Restricted"=dword:00000001
"TrustedServers"=dword:00000001
"UpdatePromptSettings"=dword:00000002
"RestrictDriverInstallationToAdministrators"=dword:00000000

[HKEY_LOCAL_MACHINE\System\CurrentControlSet\Control\Print]
"RpcAuthnLevelPrivacyEnabled"=dword:00000000

Then merge the changes with the local registry by double-clicking the new .reg file and you’re done. Needless to say, to reverse the changes, simply delete the new keys this adds (though there is no reason to do so).

Enjoy, and you’re welcome! 😉