A client recently brought in their laptop for a routine tune-up — the kind of visit that happens when it’s been a few years and things just feel a little sluggish. They mentioned some printer issues in passing, but the machine was otherwise “fine.” No complaints about data, no mention of backups, no sense of urgency beyond the printer.
What they didn’t know — and couldn’t have known — was that their external backup drive was quietly dying.
The Presenting Problem (and the Real One)
The laptop came in for printer troubleshooting and a full tune-up. Standard stuff. The printer issue turned out to have a clear root cause that I was able to identify and address during service. But the most important finding from this visit had nothing to do with the printer — and it involved a device that was never physically connected to the machine during my entire service window.
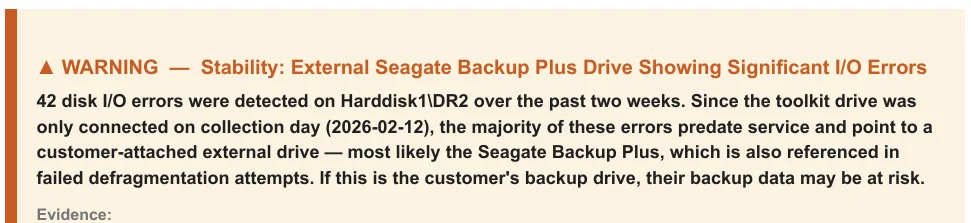
When I ran my S-Ray diagnostic analysis at intake, it flagged something unexpected: evidence of significant, recurring hardware failures on an external storage device — one that the client uses as their primary backup drive. The drive wasn’t plugged in. It was sitting at the client’s home. But the traces it had left behind in the system told a very clear story, and it wasn’t a happy one.
S-Ray identified a pattern of escalating failures on that drive over a two-week window leading up to the service visit. The system had also been unsuccessfully attempting maintenance operations on the drive, failing each time — further corroborating that something was seriously wrong with the hardware itself.
Why This Matters More Than Everything Else I Did That Day
Don’t get me wrong: the tune-up work I performed was valuable. Startup items were trimmed, updates were cleared, stability improved, bloatware was removed. The client’s machine is running measurably better across several key metrics. That’s the job, and I’m proud of the work as always.
But if that external drive fails before the client replaces it, none of that matters.
This is a backup drive. Presumably the only copy of whatever the client considers important enough to back up — family photos, financial documents, irreplaceable personal files. If that drive dies silently (and they almost always die silently), the client loses their safety net without ever knowing it was gone. The next time their primary drive has a problem, they’ll reach for the backup and find nothing — or worse, corrupted fragments of what used to be their data.
Professional data recovery on a failed external drive runs anywhere from $300 to $1,500 or more depending on the failure mode. And that’s assuming recovery is even possible. For drives with significant pre-existing I/O degradation — which is exactly what S-Ray identified here — the prognosis gets worse the longer you wait.
I’ve been doing data recovery work with professional-grade equipment since around 2012 (about six years into my business tenure). I know exactly what a drive in this condition looks like when it finally arrives on my bench six months too late. The conversation is never fun.
What Makes This Different
Any competent technician can tell you a drive is failing if you hand them the drive. Plug it in, run CrystalDiskInfo or a SMART check, and the numbers speak for themselves. That’s not special — it’s table stakes.
What happened here is fundamentally different. The drive was never connected during service. No technician could have run a health check on it because it wasn’t there. At any other shop, this visit would have ended with a faster-booting laptop and a fixed printer, and the client would have gone home with no idea that their backup infrastructure was degrading.
S-Ray caught it because it doesn’t just look at what’s in front of it — it analyzes the history of the system’s interactions with every device it’s touched. The laptop remembered what happened with that external drive over the preceding weeks, and S-Ray knew how to read those signals, correlate them, and flag the pattern as a genuine risk.
I contacted the client about the finding and recommended we examine the drive before it’s too late. That’s a conversation that could save them hundreds or thousands of dollars — or, more accurately, save them from the kind of loss that money can’t always fix.
The Uncomfortable Truth About Preventive Maintenance
Most computer service visits are reactive. Something breaks, you bring it in, someone fixes the broken thing, you go home. The fundamental problem with this model is that it can only address what you already know is wrong.
The most dangerous problems are the ones you don’t know about yet — the ones festering below the surface, accumulating damage in small increments that don’t trigger any visible symptoms until the day they trigger a catastrophic one. I’ve written about this concept before in other contexts (orphaned kernel drivers from uninstalled security software being a recent favorite example), but it applies nowhere more directly than to storage devices.
A drive often doesn’t go from “perfectly healthy” to “dead” overnight. It degrades. It throws errors. It retries operations. It reallocates sectors. These signals are there for anyone who knows where to look — but if nobody’s looking, they go unnoticed until the drive crosses the threshold from “degrading” to “unrecoverable.”
S-Ray is designed to look. Automatically, exhaustively, and — as this case demonstrates — even at devices that aren’t physically present during the analysis. This isn’t a bunch of buzzwords; this system was built from the ground up, and it leverages carefully-trained LLM data traversal, supplied with rich system history and 15+ years of pattern-building logs, to surface concerns that would otherwise slip right through the cracks. It has taken years to reach its current form, and as of 2026, I’m now actively using it to help diagnose client machines.
The Big Takeaway
The most valuable finding from this service visit was something the client never asked about, involving a device that was never connected, identifying a failure that hadn’t fully happened yet. That’s the difference between reactive repair and genuine diagnostic intelligence.
I built S-Ray because I got tired of handing machines back to clients knowing there might be something I missed — not because I wasn’t thorough, but because the sheer volume of system telemetry exceeds what any human can manually review in a reasonable service window. Every machine I service now gets the same exhaustive automated analysis, and findings like this one are exactly why.
If you’re in the Louisville area and want your machine examined by someone who looks deeper than the surface, give me a call. I’ve been doing this since 2006, and I’m still finding new ways to do it better.

 (Note the slider just below the touchpad diagram)